

Jul 07, 2020
In a series of blog posts we will focus on some of the best practices we use within Merapar to evolve our DevOps practices we have built around the AWS platform. Why? Because we think it’s fun to share knowledge and to learn from others in the industry.
Overview
To practice continuous integration and continuous deployment, we use multiple environments to manage our development, testing, acceptance and production (DTAP like) workload. To apply the pattern of least privilege, while not limiting the access on our development account, we often use a multi AWS account strategy for each of the different DTAP environments.
When using Jenkins to deploy the workloads, you want to avoid the need to maintain a Jenkins instance per DTAP environment because of the maintenance overhead and the possible differences between the instances.
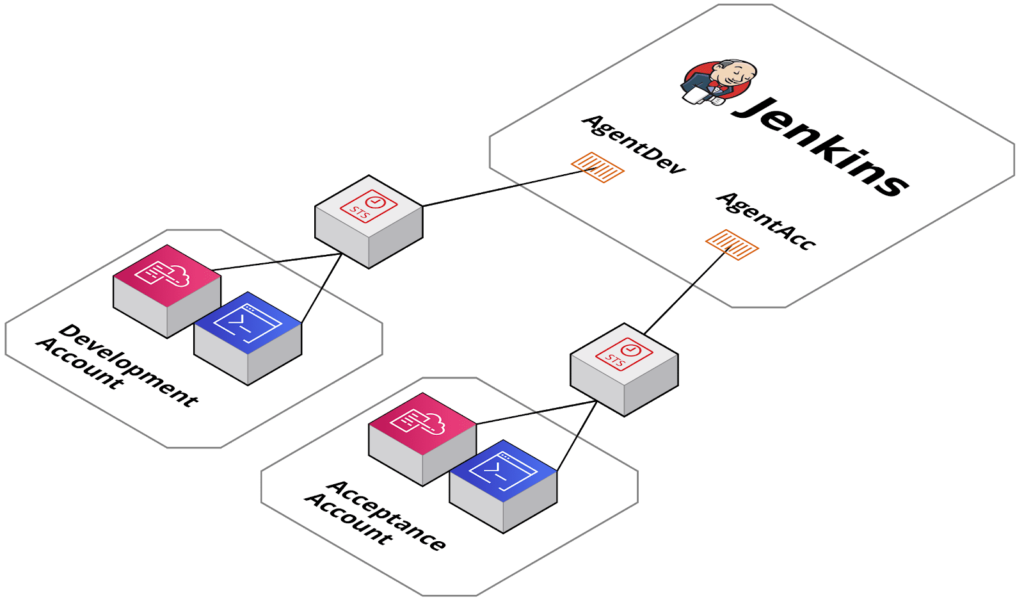
To avoid this we are using an AWS ECS Cluster to host the build agents, where each ECS task can access one of the DTAP environments. In combination with node based security in Jenkins, we can:
- Maintain a single Jenkins environment for the complete solution
- Use Jenkins node based security to main the principle of least privilege
- Deploy with the same principles to any of our environments
An overview of this solution is depicted below:
Detailed solution
As a basis for this solution the ECS Cluster plugin is used, read more about it in this blog.
Zooming into what exactly is involved when we start a build with above mentioned principles:
- When a build is started, a process is started on the Jenkins instance. In our case, this will request to start an agent.
- As the agent is configured via the ECS Plugin, this will start a task on the given ECS Cluster with the task definition specified. This will start a new container on which we will execute the build
- The task definition allows you to assume a role to one of the other accounts. Once this role is assumed you have credentials with which you can temporarily deploy resources in the target account.
- During the deployment the ECS infrastructure takes care of persisting all log files in AWS CloudWatch and all actions are auditable via AWS CloudTrail.
To bring all of this into action we need to make some configurations in both the account which hosts Jenkins and in the target account
Configuration — Target account
In the target account(s) we are required to set up an IAM role which can be used to be assumed by the Jenkins agents to deploy resources. In this example we allow you to deploy all resources. Best practice should be to limit this policy to the required resources and regions.
The following example CloudFormation stack can be used to create the deploy role:
Description: IAM role for Jenkins agent
Parameters:
 JenkinsAccountId:
   Description: The accountId of the account hosting Jenkins
   Type: String
Resources:
 DeployRole:
   Type: AWS::IAM::Role
   Properties:
     MaxSessionDuration: 43200
     RoleName: ”deploy-role"
     AssumeRolePolicyDocument:
       Version: "2012-10-17"
       Statement:
         - Effect: Allow
           Action: sts:AssumeRole
           Principal:
             AWS:
                - Ref: JenkinsAccountId
     Policies:
       - PolicyDocument:
           Version: "2012-10-17"
           Statement:
             - Action:
               - "*"
               Effect: Allow
               Resource:
                 - "*"
CloudFormation definition of the role in the target account
Configuration — Jenkins account
In the Jenkins account we need multiple resources to set up the agent. See the following CloudFormation file:
Description: Resources for Jenkins agent

Parameters:
 DockerAgentImage:
   Description: The docker image to use for Jenkins Agent
   Type: String
 TargetAccountX:
   Description: The accountId of account X
   Type: String
Resources:
 # Cluster for Jenkins agents
 JenkinsAgentCluster:
   Type: AWS::ECS::Cluster
   Properties:
     ClusterName: jenkins-agent-cluster

# Role to deploy resource
 AssumeRoleDeployAccountX:
   Type: "AWS::IAM::Role"
   Properties:
     RoleName: "deploy-role-agent-account-x"
     AssumeRolePolicyDocument:
       Version: "2012-10-17"
       Statement:
         - Effect: "Allow"
           Principal:
             Service: "ecs-tasks.amazonaws.com"
           Action:
             - "sts:AssumeRole"
     Policies:
       - PolicyName: "AllowAssumeRoleAccountX"
         PolicyDocument:
           Version: "2012-10-17"
           Statement:
             - Effect: "Allow"
               Action:
                 - "sts:AssumeRole"
               Resource:
                 - !Sub "arn:aws:iam::${TargetAccountX}:role/deploy-role"

# Log group for jenkins (agents)
 CloudWatchLogsGroupJenkinsAgents:
   Type: AWS::Logs::LogGroup
   Properties:
     LogGroupName: "/ecs/jenkins-agents"
     RetentionInDays: 30

 # Task definition for agent for target account x
 TaskDefinitionAgentAccountX:
   Type: AWS::ECS::TaskDefinition
   Properties:
     Family: jenkins-agent-account-x
     NetworkMode: bridge
     TaskRoleArn: !Ref AssumeRoleDeployAccountX
     ContainerDefinitions:
     - Name: jenkins-agent-account-x
       Image:
         Ref: DockerAgentImage
       Cpu: 2048
       MemoryReservation: 3584
       LogConfiguration:
           LogDriver: awslogs
           Options:
             awslogs-group: !Ref CloudWatchLogsGroupJenkinsAgents
             awslogs-region: !Ref AWS::Region
             awslogs-stream-prefix: jenkins
       Environment:
       # Pass the environment variables
       - Name: AWS_REGION
         Value: !Ref AWS::Region
       - Name: DEPLOY_ROLE
         Value: !Sub "arn:aws:iam::${TargetAccountX}:role/deploy-role"
In this configuration we setup:
- The AWS ECS cluster where the agent can be started.
- An IAM role with a policy which allows you to assume a role in the target account.
- An AWS CloudWatch log group to store the logs of the agent.
- A task definition which describes how the agent should be started. This includes references to the IAM role and CloudWatch log group.
Note that we back the AWS ECS cluster with AWS EC2 instances to allow for docker builds by sharing the docker.sock. This avoids complicating things we left out of the example.
Configuration — Jenkins instance
We can now configure this agent in our Jenkins instance. To do this you first have to add the ECS cluster as a Cloud:
- Goto “Manage Jenkins”.
- Select “Manage Nodes and Clouds” and “Configure Clouds”.
- Scroll all the way below and select “Add a new cloud” with the option “Amazon EC2 Container Service Cloud”.
- Give it a name, for example “jenkins-agent-cloud”.
- you can either select a credential, or when your Jenkins instance runs on EC2 make sure it has the appropriate permissions to access ECS.
- Select the region you are in e.g. eu-west-1.
- Provide the ARN of your cluster e.g. “arn:aws:ecs:<region>:<account id>:cluster/jenkins-agent-cluster”.
As second step you can add the ECS task as an agent:
- In the same Jenkins Cloud Configuration select add under “ECS Agent Templates”.
- Provide it with a label. Note that this label will later be referred to when selecting this node in the Jenkins file, in the example we will use AgentAccountX.
- As Task Definition override provide the task definition you created, e.g. “arn:aws:ecs:<region>:<account id>:task-definition/jenkins-agent-account-x:<version>”.
- Any modification to the original task definition can be made as required.
Within a Jenkins pipeline we can now use this new Jenkins agent using the agent directive in the groovy scripts:
agent {
   label AgentAccountX
}
Once the agent is started we will need to make sure that our agent assumes the role and uses those credentials to execute all commands. We have found that in general, all tools support the usage of AWS_SECRET_ACCESS_KEY, AWS_ACCESS_KEY_ID and AWS_SESSION_TOKEN. Therefore we normally execute the following command at the start of a pipeline:
CREDS=$(aws sts assume-role --profile <profile> --role-arn arn:aws:iam::<account id>:role/<role> --role-session-name <name>)
export AWS_ACCESS_KEY_ID=$(echo $CREDS | jq .Credentials.AccessKeyId -r)
export AWS_SECRET_ACCESS_KEY=$(echo $CREDS | jq .Credentials.SecretAccessKey -r)
export AWS_SESSION_TOKEN=$(echo $CREDS | jq .Credentials.SessionToken -r)
Note that the withAWS plugin cannot be used in this setup, see this explanation.